When it comes to search engine optimization (SEO), images matter.
In this post, we will be discussing SEO for images. More specifically:
Just as video can add to the user experience, so can responsive images. Whether it is a photograph, artwork, graphic design or some sort of chart or graph, an image optimization can provide a great deal of information and greatly enhance the user experience. When a popular photograph or other image is shared on social media channels, Google, Bing and other search engines will rate the originating website or web page much more highly and boost its rankings on search engine and keyword image search results.
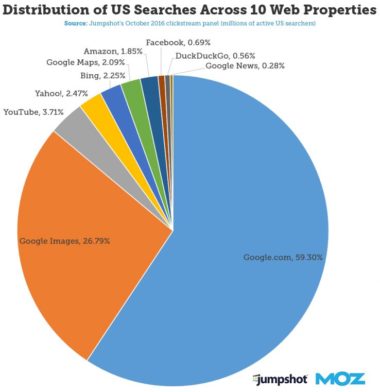
Image searches account for more than 1/4 of all online search.
Images are much easier to produce than video, although video has become easier to provide in recent years with webcams and handheld cameras. But images often times can be produced very easily and for very low cost when website owners and contributors can provide digital photos, proprietary artwork, graphs and other designs that illustrate information, entertain people and offer unique ways to demonstrate how something works or has an impact within a particular context.
Your first goal is to optimize your image to maximize user experience. While the experience of your users is qualitative, and does not directly influence your search rankings, Google or many search engines does take user behavior into consideration. If you have better images, you’ll have lower bounce rates, and lower bounce rates means you’ll enjoy a higher authority.
Optimizing your images with the appropriate meta data is important not only for Google Image search, but it will also ensure your blog posts themselves will be properly optimized. While Image SEO search gets less attention than search engines traditional search function, it can be a source of significant organic traffic, but your blog posts with embedded and properly optimized images can help your content to rocket to the top of the SERPs.
Your first step is to include images wherever you can. That doesn’t mean stuffing images into every nook and cranny of your website or web page, but it does mean having at least one significant image SEO for every major post on your blog. Without images, your site will appear bland, and people will be less willing to read your content or stick around.
Next, you’ll have to make sure your images are appropriate for your content. It isn’t enough to pair a picture of a hamburger with an article about cat behavior simply because you “needed” an image SEO. Your images should be appropriate to the content they’re intended for, and if possible, they should be original. This will keep users on your page for longer, which can improve your authority.
As an added measure, it’s a good idea to include captions with your images. While image optimization captions won’t necessarily help your images rank higher in a search, they will help users understand why you’ve chosen specific images for your posts, which leads to an overall better user experience.
Various Google updates have seriously cracked down on the overuse of keywords, including one or two keywords in your alt text can still help you rank for target queries. To add alt text, add alt=”example text here” to your image tag, where “example text here” stands in for your keyword-optimized description. Just be sure that your description is appropriate to the actual image SEO & content.
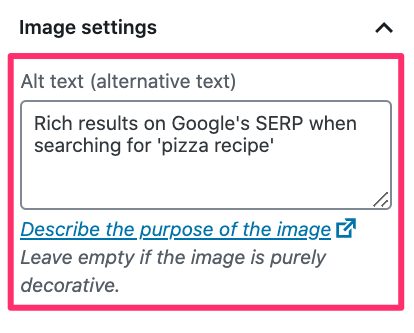
An example of image alt text using WordPress as a CMS.
In addition to an alt tag, you’ll want to make sure your image is titled appropriately. For example, if you’re using that hamburger picture from earlier, titling it “Delicious looking hamburger” is much more appropriate than “Broken ukulele.” This title will clue Google in to the image’s content, and will help it appear in more relevant searches.
As a final tactic, be sure to include all your images in your XML sitemap. Google peruses your sitemap to learn how your site is laid out and to discover new content on your site, so make sure it is updated regularly. Otherwise, your images will be harder to find, which could negate the effectiveness of your other strategies.
Site load time wasn’t always a big deal, but Google has made their mission clear: they want the best possible online experience for its users, and that means favoring sites that maximize user experience. For the past several years, site load has been a significant Google ranking factor—meaning sites with faster time to load and rank higher than sites with slower ones.
If you want to improve your ranks in search engines and give your users an all-around better experience, you need to do everything you can to minimize the time for a load of your site. The best way to do that, and the first place to start, is to optimize your website’s images for load speed.
In addition, for every image you upload, make sure you run through the checklist:
Keeping your images consistent and fast is the best way to keep your site’s time load down and give your users the best possible experience.
There are two ways to think about the “size” of an image, and both can have an impact on loading times. First, “size” can refer to the amount of data contained in an image SEO, expressed as Kilobytes (Kb) or Megabytes (Mb). Second, it can refer to the physical dimensions of the image when viewed at 100 percent.
The amount of data contained in an image is the most important factors that influences time to load. The more data an image has, the longer it takes for a browser to receive and process that data from a server. While the difference between a 1 Mb image and a 200 Kb image may not seem like much, if all of your images are oversized, the impact on your users’ time to load could be enormous.
Images with extra-large physical dimensions are the ones with higher amounts of data. Even disregarding the resolution (PPI and DPI), images with larger dimensions have a higher Image file size than their physically smaller counterparts. In addition to slowing down from the sheer amount of data that needs transferred, your load times can be impacted by the process your website takes to scale your images down.
Therefore, it’s important to size your images more efficiently. There are several easy ways to resize your images, both in terms of physical dimensions and in terms of file size:
There is no single “ideal” image file size, since many images on your site serve different purposes, but generally, you’ll want to pay attention to the following best practices:
Why size matters even if your CMS automatically resizes images
When an Internet browser reaches a site that contains an image, it first loads the full-size image you uploaded. Then, it processes the fact that it must reduce the image file size to fit on the page, so it reloads the image as part of the page. Instead of saving time by loading only the processed version of the image SEO, your user’s browser actually loads the image optimization twice—once for the full-sized version and once for the fitting version. Therefore, it’s important to upload properly sized images to your website no matter what.
The type of format you use for your images is also important. Most people are familiar with the JPG file formats for images because it is one of the highest image quality and most relevant formats. It also tends to have the highest file size because it’s made for big, high-quality images, so if you can get away with using a smaller file formats for your website, you can decrease your load times.
For example, the GIF file format supports transparency and can be animated, but it only supports 256 colors. Because of its color and definition limitations, it is a naturally smaller format. You wouldn’t want to use a GIF for a product image or for a flagship piece of photography, but you should definitely consider it for small icons or badges on your site. It won’t save you a ton of data, but every little bit counts.
PNG is typically a larger format than JPG because it features a lossless compression system—meaning, it never loses data integrity no matter how many times it is saved. JPGs do lose data integrity with each save, but because they are much smaller in image files, they are still the preferred file format for high quality images. Still, PNGs can be useful for smaller images, such as menu images.
Other image formats do exist, but these are the key players you need to understand to make sure your website loads as fast as possible.
It bears repeating: data is the most important factor for determining image load times. However, photos generally contain more data than just what reflects the actual image. Meta data, such as the date and time the picture was taken and editing history, is also stored on the image and can interfere with your loading times.
Keep in mind this data can be useful to you, especially if you’re a professional photographer, but if you’re trying to make your site’s images as lean as possible, you should remove this extraneous meta data.
There are a few ways to do this. The most straightforward is to right-click the image in question, click “Properties,” then click on the “Remove Properties and Personal Information” button toward the bottom:
You can also download an automatic tool, such as QuickFix, which does everything for you. There are also WordPress plugins and other web-based tools that can strip the meta data from all the images on your existing site, such as Image Metadata Cruncher.
If you’re creating good content, then surely you’re using images and videos with it … right? If you simply optimize the use of your Google images, you could tap into a whole new world of search traffic: image search.
So how do you do that?
When you’re choosing which image to use, look at what kind of file type it is.
You want to choose JPG images. For some reason, they just seem to perform better with image searches and end up ranking higher. One reason may be that JPGs are readable by any kind of browser a user might be searching with.
Or it may be that it’s easier to compress the size of JPG images. You don’t want tiny images; you want them to be clear and represent the idea behind them. But large images increase load time, which is never good.
The first thing you want to do is give each photo a clear, easy-to-read, and relevant title. Don’t use gibberish that tells the search engines nothing about the image.
For example, don’t stick with AG133NOV.jpg. This might help you with organizing which file is where, but it will do you NO favors in terms of img search or SEO.
Next is the Alt tag. Fill this in with relevant (but brief) information and keywords to help search engines understand what is contained in the image. Someone who is visually impaired may visit, and this tag will tell them what’s in the image too. (They use special browsing equipment that reads text for them.)
Lastly, put the description to good use. This isn’t completely necessary, but it doesn’t hurt. Here you can elaborate a bit more about what’s depicted in the image.
Whether you Photoshop unique, creative images for your blog or you take photos of your products, you want your images to be unique. It’s also been shown that using multiple images will usually help them rank better, as long as you follow all the rules for each image.
Tip: With the new Google Trends, you can research a wealth of information about any search term.
This can help with image or picture search, too. When you go to Google Trends, enter your search term and click Explore. As soon as you do, a whole lot of things load on the screen. Click on “Web Search” to the left (see below).
A menu will open to the right. Click on “Image Search.” That will open a chart of how many times people have searched for that term with image search. (Note: this number isn’t exact; it’s relative to searches as a whole.) You can also see other related search terms being searched for on image searches.
Okay, so now you have the basics of driving more traffic just by optimizing your images. But if you want to get the most out of this, there’s still more you can do.
When people click on an image in Google Images, they’re taken to a special page that features just your image. They don’t necessarily come to your page and see all the glorious content you’ve worked so hard to put together.
The image actually shows in an iframe and visitors have to keep clicking to get to your real page, which some of them won’t necessarily do. So let’s fix that, shall we?
There’s a good chance you’re running WordPress on your site. If so, you’re lucky: that makes things very simple. You just need to install a new plugin. Either of these should work:
After you install and activate one of these, users will be redirected from that iFrame page to your actual page.
If you aren’t using WordPress, you’ll need to copy and paste some code into your site. Place the following code into either the header or footer locations in your site’s code. If you’re putting it in your header, look for
/head
Type it in just before that. If you’re in the footer, do the same thing. Look for
/footer
and put it just before that. Here is the code to copy and paste in:
[message_box title=”” color=”red”]
<script type=”text/javascript”>
<!–
if (parent.frames.length > 0) { parent.location.href = location.href; }
–>
</script>
[/message_box]
Once you start receiving this new, free traffic, you’ll want to monitor the traffic. After a few months, you can analyze which types of images are bringing the most traffic, and what kind of keywords do the most business, and you’ll know where to focus more of your energy.
Here is a place that have guides to help you do just that.
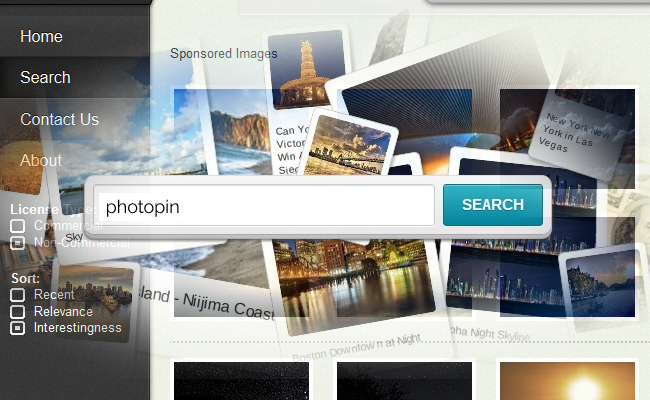
The first question most people ask about public images is “where can I find them?” The prospect of free-to-use images is certainly appealing, but that means nothing to someone who doesn’t know where to look. Finding high quality public images can be challenging, but the extra effort you put into finding perfect specimens is typically worthwhile.
One of my personal favorite sources for free public images is Photo Pin, a search resource that scours Creative Commons photos from Flickr and similar image hosting sites. If you’re looking for something specific—like a penguin for your post about Google’s Penguin update—one search can give you dozens of options. However, when you find the image you need, make sure to check its licensing. Some images cannot be used commercially.
Some other sources for free public images include:
No matter where you find your public images, you’ll also have to give proper attribution to the original owner. Different sources have different requirements for the type of language you need to include, but in general, you’ll need to say something along the lines of “Image courtesy of ____,” calling out the name of the photographer or creator and including a link back to his/her original site. Some sources include a convenient code for you to copy and paste into your document, but if they do not, it’s still important to provide attribution. It is sometimes a legal requirement and always a polite gesture.
Once all the images on your site are optimized for search, you should start to see far more organic search traffic coming in. With a higher domain authority from decreased site speed, you’ll rank higher for relevant keywords, you’ll gain extra traffic from image-based searches, and your users will be more likely to stick around if you have eye-catching, well-captioned images. The bottom line is that while it isn’t completely necessary, it is incredibly valuable, and you’d be remiss in neglecting the image optimization of your onsite images.